Finally got this project finished a couple of weekends back. It took quite awhile and there were some setbacks along the way. It started as a project to install a Dixon-Bate tow jaw. I quickly realized that I would have to drop the tank to install the jaw, so I figured that I might as well install a new fuel tank skid while I was at it. Since I was dropping the tank, I also might as well install a new fuel pump, too.
The fuel tank skid came from Stephen Peters (safarirover). It is a great product and a good value. It is made from aluminum; I took mine to the power coaters and had it coated semi-gloss black to match the tire carrier. They did a nice job.
The first complication came when I removed the hex cap screws that hold the skid in place. They were rusty and I had neglected to hose them down with Liquid Wrench in the days leading up to the repair. When I put a wrench on one of them, the head twisted off the body of the bolt. I tried a bolt extractor, only to have that break off in there as well. I ended up grinding the entire square reinforcing plate (including broken bolt) and welding on a new plate that I cut from a piece of steel bar. Once that was welded on, I drilled and tapped it, then painted it to match the crossmember and I was back in business.
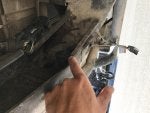
Problems continued when I tried to disconnect the fuel lines. The feed line came off without a hitch but the return line had apparently been cross-threaded by the last person to work on them. The threads stripped out and I was left with this mess:
http://www.flickr.com/photos/defender90/4784444281/in/set-72157624474481858/
After a futile search for a new set of SS fuel lines, I decided to take the "Ron-good" method. I cut the hose and line and used a short piece of flared hard line, along with some fuel-grade tubing and SS hose clamps, and spliced the line.
On a side note, if you are doing this project, you can disconnect the fuel vapor vent line (with the green connector) by bending a section of a wire coat hanger into a "U" and pressing the ends into the fitting. It comes right apart; no special tool needed.
The D-B jaw was also a pain in the ass. A few months back, I estimated the length of the bolts needed to mount the jaw and ordered some from McMaster. Once the fuel tank was out, however, I realized that I had ordered them too long. I re-measured and re-ordered, only to realize that I had neglected to factor in the thickness of my Expeditionware backing plate. Crap. I carefully measured for a third time--the proper length is 100mm, for those that are doing this project--and placed yet another McMaster order and was finally able to install my tow jaw.
For the reinstallation of the skid plate, I sourced some type 316 stainless steel hex cap screws and washers and used a liberal application of anti-seize on these.
Still, the problems continued. Everything was put back together but the truck wouldn't start. I could hear the fuel pump but it wasn't getting fuel. Another de-assembly and re-assembly later, it was determined that the fuel lines were reversed at the fuel pump. ****. Lesson learned: don't do these things late at night.
The finished product looks awesome and it was worth the sweat equity.
http://www.flickr.com/photos/defender90/4907327979/in/set-72157624474481858/
http://www.flickr.com/photos/defender90/4907919952/in/set-72157624474481858/
http://www.flickr.com/photos/defender90/4907326379/in/set-72157624474481858/
The fuel tank skid came from Stephen Peters (safarirover). It is a great product and a good value. It is made from aluminum; I took mine to the power coaters and had it coated semi-gloss black to match the tire carrier. They did a nice job.
The first complication came when I removed the hex cap screws that hold the skid in place. They were rusty and I had neglected to hose them down with Liquid Wrench in the days leading up to the repair. When I put a wrench on one of them, the head twisted off the body of the bolt. I tried a bolt extractor, only to have that break off in there as well. I ended up grinding the entire square reinforcing plate (including broken bolt) and welding on a new plate that I cut from a piece of steel bar. Once that was welded on, I drilled and tapped it, then painted it to match the crossmember and I was back in business.
Problems continued when I tried to disconnect the fuel lines. The feed line came off without a hitch but the return line had apparently been cross-threaded by the last person to work on them. The threads stripped out and I was left with this mess:
http://www.flickr.com/photos/defender90/4784444281/in/set-72157624474481858/
After a futile search for a new set of SS fuel lines, I decided to take the "Ron-good" method. I cut the hose and line and used a short piece of flared hard line, along with some fuel-grade tubing and SS hose clamps, and spliced the line.
On a side note, if you are doing this project, you can disconnect the fuel vapor vent line (with the green connector) by bending a section of a wire coat hanger into a "U" and pressing the ends into the fitting. It comes right apart; no special tool needed.
The D-B jaw was also a pain in the ass. A few months back, I estimated the length of the bolts needed to mount the jaw and ordered some from McMaster. Once the fuel tank was out, however, I realized that I had ordered them too long. I re-measured and re-ordered, only to realize that I had neglected to factor in the thickness of my Expeditionware backing plate. Crap. I carefully measured for a third time--the proper length is 100mm, for those that are doing this project--and placed yet another McMaster order and was finally able to install my tow jaw.
For the reinstallation of the skid plate, I sourced some type 316 stainless steel hex cap screws and washers and used a liberal application of anti-seize on these.
Still, the problems continued. Everything was put back together but the truck wouldn't start. I could hear the fuel pump but it wasn't getting fuel. Another de-assembly and re-assembly later, it was determined that the fuel lines were reversed at the fuel pump. ****. Lesson learned: don't do these things late at night.
The finished product looks awesome and it was worth the sweat equity.
http://www.flickr.com/photos/defender90/4907327979/in/set-72157624474481858/
http://www.flickr.com/photos/defender90/4907919952/in/set-72157624474481858/
http://www.flickr.com/photos/defender90/4907326379/in/set-72157624474481858/
") not trying to make anything overkill.
not trying to make anything overkill.