Defender Source Forum banner

86 110 LS Build and Restore

54K views 173 replies 51 participants last post by  Davis  
#1 ·
I have always wanted a Defender and have been "looking" for a few years now. After finishing and selling my last project (55 Willy's Wagon on a 2nd Gen Toyota 4Runner frame and drivetrain) I had a little bit of $$ to play with.

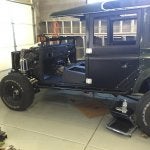
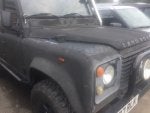
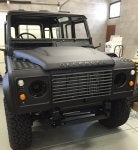
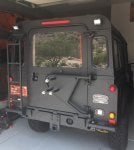
After searching for a good deal on a proper candidate I found this 86 110 rust bucket across the pond...

She was a "blocker" looked good from a block away but up close not so bueno...

But, the frame was solid and she ran great. After getting her home and driving her around for several months I decided I needed to get her ready for the big move as we are moving from Phoenix to Alaska in a year and I needed to get her rustproofed and ready for colder weather.

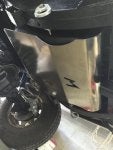
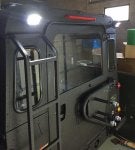
The 2 inch gap where the windows are supposed to meet the body works great in Phoenix but I don't think it will be as nice in cold, snow and rain....
 

Attachments

#119 ·
Jesse, the build looks good. Can I ask what your plan is for the wiper motor as I see you cut out the larger opening for the heater box on the nice bulkhead?
 
#122 ·
HD Springs

I was not happy with how low the front end of the truck was sitting and I haven't even added the heavy front bumper or winch yet. So I decided before I got the fenders on and everything put back together I would swap out the medium load Terrafirma front springs with the heavy version. When both sides were done it added and inch and a quarter and she is sitting almost level now from front to back. I also added a Terrafirma gas tank skid plate since the stock tank is pretty thin metal.

If anyone needs a brand new set of medium front springs let me know. They were installed but never driven on.
 

Attachments

#123 ·
Swivel Ball Seals....UGH!

While I was swapping out the front springs I noticed the left side swivel ball seal was leaking pretty good and the truck has not even been driven yet. I guess I should have replaced these when I did the hubs and bearings, but at the time I did not want to dive into it.

I took the plunge and put in new swivel balls, seals, bearings and new CV joints. The old swivel balls weren't in too bad of condition just some light pitting. What a nasty messy job to replace them though....
 

Attachments

#124 ·
Slow but Steady...

Made a little more progress this weekend. Cleaned up the windshield frame and installed it along with new top and bottom seals. Got the vent flaps in and also cut out the openings for the new back up lights. I went with two 18 watt LED's. Should be nice and bright. I also have them on a switch along with two pivoting LED's at the top of the rear door to use when camping/off roading, etc...
 

Attachments

#125 ·
Too HOT to work!

Well it has been 120 degrees outside and about 150 in the garage so progress has been slow! I have been doing what I can inside the house during the heat (the wife really loves this). I recently swapped out the glass fuses to blade fuses.
 

Attachments

#126 ·
I wanted to cover up the opening in the front wheel wells so mud and rocks are not damaging the foot wells. An easy solution was to mount a set of mud flaps to cover the openings. I also got both wings mounted, the hood, release cable, hood latch and grille.
 

Attachments

#127 ·
Few More Things...

A few more small things buttoned up. I installed the vent bug screens, floor panels and seals, bulkhead hump, gear box cover.

Also rebuilt the wiper assembly. Cleaned and re-greased the motor, installed a new rack and new wiper arm mounts. also have new tubing and spray nozzles to put in after paint.

I think she is almost ready to be sprayed....
 

Attachments

#128 ·
Doors on..

Doors are on and I seam sealed all the areas that needed it on the floorboards and cargo area. She is booked to go to the Line-X shop on Monday the 15th of August.

Although I should probably leave her in this rainbow pattern of white, green, and black. I wouldn't have to worry about anyone messing with it that way I bet!
 

Attachments

#142 ·
The Black Beast is Home!

Well I picked her up Saturday from Line-X and towed her home! I know this is a lot to ask being a Land Rover and all but I am hoping this is the last time she has to be on the back of a tow truck!! Haha yeah right....
 

Attachments

#144 ·
Let the Games Begin!

The wiring has begun.....OMG I really hate wiring! Its such a slow and painful process. I got the headlights, turn signals, front wipers, running lights, brake lights all working so far. Need to get the rear wiper/washer hooked up along with all the add on accessories, off road lights, heated seats, heated mirrors, heated windscreen, winch, compressor, gauges, electric fans, etc. etc. etc..........
 

Attachments

#147 ·
Helpful Hint #3497

If you need new doors as I did and you do not have any of the inner door parts you can reuse from your old doors, don't buy new door shells. Make sure to get new or used doors with all the guts already inside. The only pieces I could reuse from my original doors was the glass.

I spent a few days just figuring out all parts I needed to order! Now I still need to install them!
 

Attachments

#148 ·
Roof Rack On!

After much research and deliberation I ordered a Front Runner Slimline II Roof Rack. I settled on this one as I needed a completely flat platform for a roof tent, paddle boards and kayaks.

It arrived in 2 boxes and about 300 pieces, but after I got past the IKEA flashbacks it was not too bad of an install. Little bit of a challenge as I installed it by myself.
 

Attachments

#149 ·
Sway Bar Added

My Truck did not come with any sway bars so I figured I better add one with a roof rack and roof top tent in the plans. I wanted one I could disconnect when off road if needed so I opted for the X-Deflex. It locks/unlocks through an old school 4x4 hub. The fit and install was smooth, I will update after I get some miles on it.
 

Attachments