HOW TO: Dorman Clutch Master Cylinder Conversion (Defender & Series late-IIA/III)
Ok, I've been putting this write-up off for WAY too long (wrapped up this conversion on the 90 this past summer, and looks like the 130 will be due for the same since the MC is on it's way out too). First of all, thanks for Briggs for pushing me into adapting this conversion for the Defender, he pointed me to a thread over at ExPo from a bloke Matthew that had done this conversion on his Series so it reasoned that it could easily be adapted to the Defender...and there was also a thread over on Aulro.com forum that looked like they were able to adapt it as well.
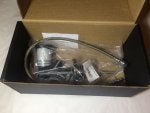
I'll start with the self-serving portion of this post") , but also just finished the details on a Conversion "Kit" for this conversion that includes the modified Dorman Master Cylinder (replacing original genuine part# STC500100) and a replacement braided stainless-steel hydraulic line (to replace the hard-line Clutch Pipe...original part# NRC8330 for RHD Defender, #NRC8329 for LHD Defender, or #NRC3287 for Series IIA/III):
, but also just finished the details on a Conversion "Kit" for this conversion that includes the modified Dorman Master Cylinder (replacing original genuine part# STC500100) and a replacement braided stainless-steel hydraulic line (to replace the hard-line Clutch Pipe...original part# NRC8330 for RHD Defender, #NRC8329 for LHD Defender, or #NRC3287 for Series IIA/III):
https://www.seriesdefender.com/all-products/clutch-master-cylinder.html
However, for the DIY folks here's the "scoop" on the what/why/how-to...and I've also included a step-by-step PDF overview that you can download at the bottom of this post as well, but see below for photos and detailed description of the process:
THE ISSUE
The original Clutch Master Cylinder (part# STC500100) on a Land Rover Defender (model year 1983-2006) and Series late-IIA & III (model year 1971-1984) is made from aluminum, and as such is prone to having the inner wall of the cylinder wear over time…creating a situation where the clutch master may leak, and/or the wearing of the wall of the cylinder can also cause contamination of the fluid (turns from a nice clear golden color to a cloudy grayish color). This contamination can/will also cause failure of the downstream Clutch Slave Cylinder (due to the contaminants creating a sludge buildup inside of the slave cylinder). NOTE: the “wear” issue can be amplified by improper or lack of “free-play” adjustment on the Master Cylinder, which is reiterated below in the last step #10…however generally this is only a contributing factor and not a main “cause” of the issue based on prior experience with this master cylinder failure.
THE FIX
Dorman makes a cast-iron master cylinder that is much more robust, and based on the materials (cast iron vs aluminum) are much less prone to the inner wall wearing. As such, you should see little to no fluid contamination over time and likewise should not experience any frequent master cylinder or slave cylinder failure. Though not originally designed to fit the Land Rover Defender, with a few modifications it can be made to fit seamlessly into the Rover clutch pedal housing.
WHAT YOU’LL NEED
• Your original Clutch Master Cylinder (i.e. the one that has failed and/or is leaking).
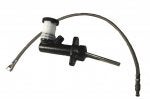
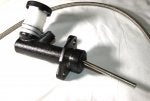
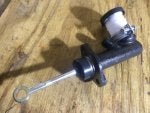
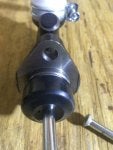
• Dorman CM106439 Clutch Master Cylinder [note the master has a 7/16"-24 inverted flare fitting].
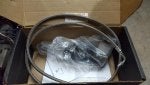
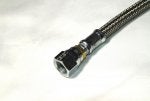
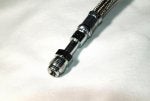
• Custom braided-stainless hydraulic line made up, approximately 30” in overall length, 3/16”-1/4” inner diameter, with a #4 hydraulic swivel-fitting on one end [which the end fittings are part# FBM1101 / 63-190600-4, and is essentially a 7/16-20 female fitting] and either Option #1 or Option #2 [see below] for the fitting on the other end of the hydraulic line.
• Option #1: Utilize another #4 hydraulic swivel-fitting on the end of the other line, and use a male-male adapter (42° Inverted Flare to 37° Flare) Part# 202124-4-4S to run from flex-line to master cylinder [this is essentially a 7/16-20 to 7/16-24 adapter].
![]()
![]()
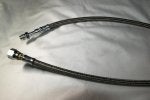
• Option #2: This is a streamlined 2nd version of the hose for this kit, which gets rid of the adapter and does a swivel fitting directly on the end of the braided stainless clutch line. Essentially it is a #4 female swivel-fitting directly on one end, and a 7/16-24 male fitting on the other end. This is what I use in my SDO Conversion Kits.
![]()
![]()
![]()
![]()
[NOTE: I included Option #1 since I've found that many hydraulic shops actually can't do the "single" hose option without an adapter...the kit I have does the more streamlined Option #2 with the single hose, but for the DIY folks just wanted to include this Option #1 in case the hydraulic line shop was unable to do a streamlined version of the hose fitting going to the MC]
WHAT YOU’LL DO
Slight modifications to the Dorman Master cylinder, as follows:
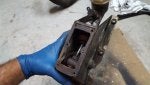
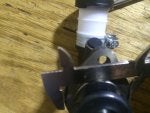
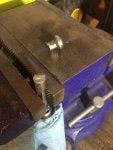
1. Cut the “ears” off the Dorman Master just slightly, not much maybe 1/4" total (so 1/8” off each side)…this is just so it will actually fit inside of the clutch housing. The Dorman measures 2-1/16” wide dimensionally, but the Clutch “housing” opening is only 2”…so taking off the 1/4" from the width on the Dorman Clutch Master allows it to fit seamlessly into place:
![]()
![]()
![]()
![]()
![]()
![]()
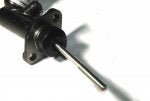
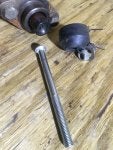
2. After the ears are cut, you’ll need to “swap” the pushrod from your existing master cylinder to the Dorman master cylinder.
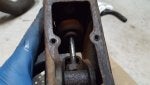
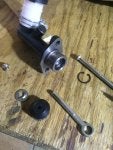
3. Remove the pushrod from your existing/original Clutch Master Cylinder, this can be achieved by removing the rubber “boot” at the end of the Clutch Master. Once the boot is off, you’ll see a circlip holding a washer in place over the pushrod. Remove this circlip and the washer & pushrod will be released from the housing. Retain the original pushrod, other items (washer, circlip, etc) from the old Master can be discarded:
![]()
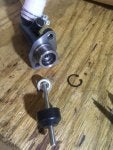
4. Turning to the Dorman Clutch Master, essentially you need to cut the Dorman pushrod in half, harvest the retaining washer, swap that washer over to your original pushrod, and install your original pushrod on the Dorman:
![]()
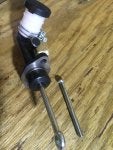
5. On the Dorman, likewise remove the rubber boot to expose the existing circlip/washer/pushrod:
![]()
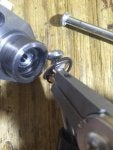
6. Using a pair of snap-ring pliers, remove the circlip so that the pushrod comes out of the Dorman:
![]()
![]()
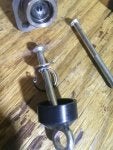
7. Once it is separated, you’ll need to “harvest” the washer from the Dorman pushrod so that it can be used with the old pushrod from the Clutch Master. This can be achieved by using a cutting wheel to remove the end of the pushrod:
![]()
![]()
![]()
8. Once this is done, swap over the washer & boot from the Dorman pushrod to the old pushrod:
![]()
9. Reinstall the “old” pushrod (with new washer & circlip) back onto the Dorman, refit the boot into place and you’re done!
![]()
![]()
![]()
![]()
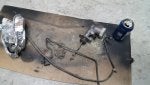
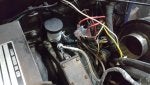
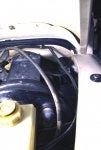
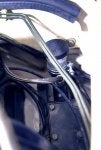
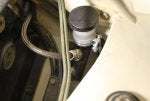
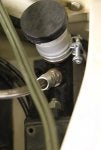
10. You’re ready to install your new modified Dorman Clutch Master Cylinder into your Defender, fill the system, bleed, and you're good to go!
![]()
![]()
![]()
![]()
![]()
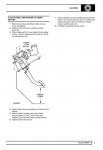
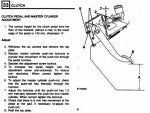
IMPORTANT: remember to adjust the free-play of your new Dorman Master Cylinder just as you would for installing any new Clutch Master. For your reference we’ve included the workshop manual pages on this procedure here in this document.
![]()
![]()
PDF DOWNLOAD & SDO "CONVERSION KIT" INFORMATION
I'm also attaching a PDF download of the above instructions here as well:
View attachment SDO Dorman Conversion Write-Up.pdf
And lastly as mentioned above I've got plug-and-play "kits" ready to go for those folks that don't want the hassle of working out the details themselves:
SDO DORMAN CLUTCH MASTER CYLINDER CONVERSION KIT
![]()
![]()
![]()
![]()
![]()
![]()
Ok, I've been putting this write-up off for WAY too long (wrapped up this conversion on the 90 this past summer, and looks like the 130 will be due for the same since the MC is on it's way out too). First of all, thanks for Briggs for pushing me into adapting this conversion for the Defender, he pointed me to a thread over at ExPo from a bloke Matthew that had done this conversion on his Series so it reasoned that it could easily be adapted to the Defender...and there was also a thread over on Aulro.com forum that looked like they were able to adapt it as well.
I'll start with the self-serving portion of this post
, but also just finished the details on a Conversion "Kit" for this conversion that includes the modified Dorman Master Cylinder (replacing original genuine part# STC500100) and a replacement braided stainless-steel hydraulic line (to replace the hard-line Clutch Pipe...original part# NRC8330 for RHD Defender, #NRC8329 for LHD Defender, or #NRC3287 for Series IIA/III):https://www.seriesdefender.com/all-products/clutch-master-cylinder.html
However, for the DIY folks here's the "scoop" on the what/why/how-to...and I've also included a step-by-step PDF overview that you can download at the bottom of this post as well, but see below for photos and detailed description of the process:
THE ISSUE
The original Clutch Master Cylinder (part# STC500100) on a Land Rover Defender (model year 1983-2006) and Series late-IIA & III (model year 1971-1984) is made from aluminum, and as such is prone to having the inner wall of the cylinder wear over time…creating a situation where the clutch master may leak, and/or the wearing of the wall of the cylinder can also cause contamination of the fluid (turns from a nice clear golden color to a cloudy grayish color). This contamination can/will also cause failure of the downstream Clutch Slave Cylinder (due to the contaminants creating a sludge buildup inside of the slave cylinder). NOTE: the “wear” issue can be amplified by improper or lack of “free-play” adjustment on the Master Cylinder, which is reiterated below in the last step #10…however generally this is only a contributing factor and not a main “cause” of the issue based on prior experience with this master cylinder failure.
THE FIX
Dorman makes a cast-iron master cylinder that is much more robust, and based on the materials (cast iron vs aluminum) are much less prone to the inner wall wearing. As such, you should see little to no fluid contamination over time and likewise should not experience any frequent master cylinder or slave cylinder failure. Though not originally designed to fit the Land Rover Defender, with a few modifications it can be made to fit seamlessly into the Rover clutch pedal housing.
WHAT YOU’LL NEED
• Your original Clutch Master Cylinder (i.e. the one that has failed and/or is leaking).
• Dorman CM106439 Clutch Master Cylinder [note the master has a 7/16"-24 inverted flare fitting].
• Custom braided-stainless hydraulic line made up, approximately 30” in overall length, 3/16”-1/4” inner diameter, with a #4 hydraulic swivel-fitting on one end [which the end fittings are part# FBM1101 / 63-190600-4, and is essentially a 7/16-20 female fitting] and either Option #1 or Option #2 [see below] for the fitting on the other end of the hydraulic line.
• Option #1: Utilize another #4 hydraulic swivel-fitting on the end of the other line, and use a male-male adapter (42° Inverted Flare to 37° Flare) Part# 202124-4-4S to run from flex-line to master cylinder [this is essentially a 7/16-20 to 7/16-24 adapter].

• Option #2: This is a streamlined 2nd version of the hose for this kit, which gets rid of the adapter and does a swivel fitting directly on the end of the braided stainless clutch line. Essentially it is a #4 female swivel-fitting directly on one end, and a 7/16-24 male fitting on the other end. This is what I use in my SDO Conversion Kits.

[NOTE: I included Option #1 since I've found that many hydraulic shops actually can't do the "single" hose option without an adapter...the kit I have does the more streamlined Option #2 with the single hose, but for the DIY folks just wanted to include this Option #1 in case the hydraulic line shop was unable to do a streamlined version of the hose fitting going to the MC]
WHAT YOU’LL DO
Slight modifications to the Dorman Master cylinder, as follows:
1. Cut the “ears” off the Dorman Master just slightly, not much maybe 1/4" total (so 1/8” off each side)…this is just so it will actually fit inside of the clutch housing. The Dorman measures 2-1/16” wide dimensionally, but the Clutch “housing” opening is only 2”…so taking off the 1/4" from the width on the Dorman Clutch Master allows it to fit seamlessly into place:


2. After the ears are cut, you’ll need to “swap” the pushrod from your existing master cylinder to the Dorman master cylinder.
3. Remove the pushrod from your existing/original Clutch Master Cylinder, this can be achieved by removing the rubber “boot” at the end of the Clutch Master. Once the boot is off, you’ll see a circlip holding a washer in place over the pushrod. Remove this circlip and the washer & pushrod will be released from the housing. Retain the original pushrod, other items (washer, circlip, etc) from the old Master can be discarded:
4. Turning to the Dorman Clutch Master, essentially you need to cut the Dorman pushrod in half, harvest the retaining washer, swap that washer over to your original pushrod, and install your original pushrod on the Dorman:
5. On the Dorman, likewise remove the rubber boot to expose the existing circlip/washer/pushrod:

6. Using a pair of snap-ring pliers, remove the circlip so that the pushrod comes out of the Dorman:
7. Once it is separated, you’ll need to “harvest” the washer from the Dorman pushrod so that it can be used with the old pushrod from the Clutch Master. This can be achieved by using a cutting wheel to remove the end of the pushrod:

8. Once this is done, swap over the washer & boot from the Dorman pushrod to the old pushrod:
9. Reinstall the “old” pushrod (with new washer & circlip) back onto the Dorman, refit the boot into place and you’re done!

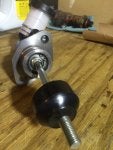


10. You’re ready to install your new modified Dorman Clutch Master Cylinder into your Defender, fill the system, bleed, and you're good to go!

IMPORTANT: remember to adjust the free-play of your new Dorman Master Cylinder just as you would for installing any new Clutch Master. For your reference we’ve included the workshop manual pages on this procedure here in this document.
PDF DOWNLOAD & SDO "CONVERSION KIT" INFORMATION
I'm also attaching a PDF download of the above instructions here as well:
View attachment SDO Dorman Conversion Write-Up.pdf
And lastly as mentioned above I've got plug-and-play "kits" ready to go for those folks that don't want the hassle of working out the details themselves:
SDO DORMAN CLUTCH MASTER CYLINDER CONVERSION KIT